Kalibrasi Monitor Tecgear PF27OG Prime 27″

(PostNote: I kinda forgot that I have a blog, and that I usually wrote in English, but this one is in Indonesian, sorry for the few people that followed my blog and expecting English, I just felt like writing something up and wrote it in my native language)

Gaming Monitor PF270G bikinan Tecgear memiliki beberapa spesifikasi seperti berikut:

Ukuran27″
Resolusi FHD 1920 x 1080 @165 Hz
Kecerahan250 cd/m²
Viewing Angle178°
Kontras1000:1
sRGB100%
Response Time1 ms (MPRT)
Adaptive SyncFreesync dan GSync compatible
PortsDP 1.2, HDMI 1.4, USB dan Audio
PanelIPS dengan LED backlight
Untuk spesifikasi lebih lengkapnya silahkan kunjungi halaman produk di sini.

Spesifikasinya boleh dibilang sangat mewah untuk monitor yang saat ini dibanderol dengan harga 2.1 Jt di tokopedia, 2.4 jt (290 SGD) di shopee Singapura, dan 2.1 Jt (575 RM) di shopee Malaysia, semuanya harga yang didiskon, sedangkan harga resmi dari halam produk di tecgear adalah 6 jt an ($399).

Anda membaca blog saya ini mungkin karena anda merasa tidak mendapatkan kualitas yang dijanjikan oleh tecgear: refresh rate cuman 60 Hz, video card tidak mendeteksi monitor yang mampu melakukan adaptive sync, warnanya tidak 100% sRGB, response timenya lambat sehingga ghosting masih terlihat ketika bermain game, view angle cuman sekelas laptop yang kalau dilihat dari samping warnanya terlihat pudar, dan lain sebagainya.

Jangan khawatir, monitor ini seganas spesifikasinya kok, permasalahannya memang monitor ini sangat kurang untuk urusan dokumentasi dan software pendukung: tidak ada display driver sehingga windows mendeteksi monitor ini sebagai plug n play monitor dan OSD tidak memiliki banyak opsi yang bisa diutak atik.

Untuk mendapatkan kualitas mewah yang dimiliki monitor ini di Windows 10 / 11, Silahkan ikuti langkah2 dibawah ini:

Pastikan monitor anda tersambung ke video card menggunakan kabel Display Port, bukan HDMI (HDMI 1.4 hanya mensupport up to 120Hz refresh rate di resolusi 1080p)

Buka OSD dan set Freesync <ON> di tab Extra.

Jika anda menggunakan video card nVidia, bukan nvidia control panel dan setup gsync sesuai yang anda mau, jika anda menggunakan AMD, bukan AMD Adrenaline dan nyalakan opsi Freesync in tab Display:

Selanjutnya buka OSD dan set HDR <ON> di tab Luminance, jangan khawatir kalau tiba tiba tampilan anda menjadi sangat mencolok (sangat gelap/terang), ini akan kita konfigurasi di langkah langkah selanjutnya.

Buka Color Management dengan menulis “Color Management” di windows search , atau dengan menekan tombol berlogo windows lalu tulis “Color Management”.

Tekan tombol “Add”, dan pilih ICC profile sRGB IEC61966-2.1 dan tekan OK.

set sRGB IEC61966-2.1 sebagai Default profile, hasil akhirnya akan seperti dibawah ini:

Silahkan tutup Color management.

Jika anda menggunakan video card AMD atau anda malas mengutak atik warna menggunakan nVidia color settings, bukalah aplikasi Color Calibration dengan menulis “Calibrate Display Color” di windows search bar.

Ikutilah prosedur Color Calibration dengan sebaik baiknya sambil jangan lupa untuk mengubah ubah Black level di OSD untuk mendapatkan hasil kalibrasi yang sempurna, lakukan semua prosedur sampai selesai dan seharusnya anda sudah mendapatkan kualitas yang dijanjikan oleh tecgear: 100% sRGB, viewing angle 178 derajat, dan lain sebagainya, silahkan anda test sendiri dengan memainkan game yang anda miliki, dijamin terpana dengan detil dan keragaman warna yang ditampilkan oleh monitor ini, sekaligus kontrol (input) yang sangat responsif selama video card anda mampu menggenjot 165 fps atau lebih, tapi walaupun video card anda cuman kuat 60 fps tetap terasa lebih responsif berkat 1 ms response time yang dimiliki monitor ini (video signal di translasi ke panel IPS cuman memakan waktu 1ms berdasarkan standar MPRT)

Bagi anda yang menggunakan video card nVidia dan ingin mengkalibrasi sedetil detilnya sampai benar benar dapat 100% sRGB, super smooth aliasing dan super wide viewing angle, silahkan adjust desktop color settings di nVidia control panel, set Gamma ke 2.2 (hanya bisa 100% sRGB di gamma ini), turunkan Contrast ke 0% dan main main kan brightness sampai Reference image di kanan terlihat bagus: semua warna terlihat, gradasi grayscale dan RGB halus tidak terpotong dibagian belakang atau depan, dan mata anda dapat membedakan kotak hitam dan abu abu dipojok kanan reference image.

Beberapa halaman website ini mungkin dapat membantu anda untuk mendapatkan kalibrasi yang sempurna:

  1. TestUFO aliasing visiblity, untuk mengetest kualitas aliasing.
  2. Lagom grayscale gradient, untuk mengetest grayscale banding
  3. Lagom contrast, untuk mengetest RGB banding
  4. Lagom viewing angle, untuk mengetest viewing angle
  5. TestUFO MPRT, untuk mengetest response time.

Demikian cara kalibrasi monitor tecgear prime 27″, mudah mudahan berguna.

Saya sendiri berhasil mendapatkan full sRGB dengan viewing angle sempurna , aliasing yang sangat halus, dan response time yang sangat cepat (lebih tinggi dari 1ms tapi hampir semua monitor yang pasang label 1ms response time kenyataannya lebih dari itu, jadi tidak masalah buat saya).

Saya sangat puas dengan kualitas gambar monitor ini, terutama kontrol yang sangat responsif di game2 yang fast pace (saya suka main game racing), dan gambar yang sangat indah dimana semua spektrum warna keluar di game2 adventure RPG seperti witcher dan skyrim.

Bagi anda yang masih memilih milih untuk membeli gaming monitor baru, monitor dengan spec seperti Tecgear prime 27″ ini normalnya ada di kisaran harga 3 jt, seperti ASUS TUF VG279 (3.7 jt), Viewsonic VX2718 (3.4 jt), dan AoC 27G2SPE (3.3 jt). Jika anda, seperti saya, bisa membeli monitor ini diharga diskon dibawah 2.5 jt maka saya sangat merekomendasikan monitor ini, tapi jika anda mendapatkan harga normal yg mungkin sekitar 4-5 jt an, silahkan lakukan riset2 terlebih dahulu, terutama jika anda ingin menggunakan monitornya lebih dari keperluan gaming, misalnya untuk desain grafis, fotografi atau art production, karena monitor ini memiliki konfigurasi yang sangat minim di OSD nya sehingga akan sulit mendapatkan color setting yg anda inginkan untuk kondisi2 khusus seperti ini.

Hardcore Gamer is a bad Game Developer

If you’re offended by the title then please hold your horses and calm down! let us define what a hardcore gamer is before you proceed further into reading this blog post. Hardcore gamer that I am talking about is someone who play video games as a primary hobby and tend to spend large amounts (if not all) of their free time playing games, they are those who would turn on their PC/console to play games as soon as they get back from work or school and would only stop playing after they run out of juice.

I am going to start with the reason why it is so, it is simple really: hardcore gamer do not have any free time left to polish their game development skills.

Some of us became a game developer because of our passion in video games. Undoubtedly this passion comes from playing some really fun and memorable games at some point in our lives, we may have spent hundreds if not thousands of hours playing games and then one day we decided to build a career as a game developer and starts making a game that we really love. There is a transition here, where we transformed from a consumer to a creator.

Being a game developer (creator) is different from being a gamer (consumer), it is a very hard path to travel, no matter if you are a programmer, an artist, a designer, or a producer. We are creating a creative product in a limited time with many technical and financial constraints and the available technology and techniques keeps on changing in a very fast pace. If we still have the mentality of a hardcore gamer then we will most likely unable to catch up with the industry, our skill sets becomes obsolete, our techniques becomes in-efficient, and all we can do is criticizing and commenting other games (just like what a consumer usually do).

You may think that spending lots of hours into gaming will increase your game development skills, you may think that these hours upon hours of gaming experiences that you have acquired will help you in designing, implementing, drawing, and producing your game. Well they are not, even if they are they will be very insignificant.

Rather than playing games like a hardcore gamer, you better of learning, polishing your skills, modding a game or just creating something, we have already spent a lot of time playing games before we became a game developer and adding more hours into it won’t do us good in the long run, it’s inefficient and time consuming and it has a risk of corrupting our mind to become more of a consumer rather than a creator. Nowadays, there are many convenient and effective ways to keep up with the latest trend in gaming without actually playing games: there are youtubers, game reviewers, game wikis, etc. Yes, you lose the actual experience from playing a game, but hell, you have had enough experience before you became a game developer, haven’t you?

I am not saying that we should not play games, on the contrary, we do need to play games from time to time. What I am trying to say is that you should never play them like a hardcore gamer do, in which case you will not have the time to polish your skills.

In time management, there is a rather famous diagram called Eisenhower Matrix that looks something like this:

Eisenhower-Matrix

Quadrant 1 is working on your job at a game studio or working on the game you are currently making (professionally) as an indie game developer, Q1 is important and urgent, you will get fired if you neglect your job, or you won’t be able to pay your bills if you’re not releasing your indie game.

Quadrant 2 is polishing your game development skills or doing something that you know will increase your capability as a game developer, whether it’s reading game development books or articles, watching tutorials, trying to increase your productivity by understanding the tools/engine you are using, implementing or prototyping a concept, modding an existing games, learn math, learn color theory, socializing with other game developers or people in the industry, etc. They are all very important, but they are not urgent.

Quadrant 3 is not important but it is urgent, usually it has a lot of things to do with social obligations such as attending reunion, going online in Facebook / snap-chat / twitter / Instagram only to keep our net presence and ‘existence’, login to an online game because the pressure from your online gaming community who misses you so much while you’re at work, going on a trip with a social circle that you don’t even really care about, joining political debates in the internet (it seems very urgent because you need to correct these imbeciles way of thinking, but you have to admit that it is far from important). Their urgency has no meaning because they are not important, but it is hard to let go because of personal insecurity of being shunned from your social circle. I personality think this quadrant is very toxic if not managed properly, oh and yeah, MMO games are in this quadrant.

Quadrant 4 is hedonism and leisure, it is where you spent your time for non-important things, things in this quadrant usually lift the stress out of your shoulder if you can manage it wisely but it is very dangerous if being done extensively up to the point of addiction; This is where playing games are at.

Eisenhower matrix is a very tools to manage our time, the trick is to just hold on to this princile: “The more important things should not be at the mercy of the less important things”. This will make us ends up spending most of our time doing Quadrant 1 and Quadrant 2. Q1 is the presence, it’s in front of our face and Q2 is for the future,  it contains efforts to become better and better at what we are doing.

Quadrant 1 is a no-brainer, we simply have to do it because of our responsibility requires us to do it. For the other three quadrants, we should always focus our effort in Quadrant 2; But most of the time we trade it off by doing Quadrant 3 or 4 because Quadrant 2 lacks the urgency and the leisure, but if you neglect it, it will bites you in the buttocks really hard when there comes a time in which you really need them (which means they shift from Q2 to Q1 because of the urgency), for example, let’s say that you are working as a 2D game artist and you are tasked with drawing and animating several sprites of wolves, and the deadline is in a couple of weeks; If you spent most of your time playing games  you would not be able to do it properly even if there are wolves in it (witcher 3 or world of warcraft) and ended up with ugly animations (or even worse, you can’t meet your deadline because you are still learning how to draw a wolf). It would be a different matter if you spent your free time polishing your animation skills and keep on expanding the range of animals that you can draw, even knowing how to draw a lion would really help in understanding the structure of a wolf, you will have something to start working on, you have the base knowledge to do your things, and you will constantly become a better game developer because you keep on polishing your skills as a creator rather than your skills as a consumer.

The pitfall of creative game iteration

Creating a game is a creative process, we are creating something abstract with one definitive goal in mind and that is “fun” which is as abstract and as subjective as we can get. One method to help us in expressing our creativity is by iterating the game from the bottom up: implement one feature at a time and then implement another feature on top of it and so on and so forth, and we do this progressively in small steps, each feature may be revisited later to be polished or tweaked or even to be changed or disbanded, the whole process is very flexible and it embraces changes which in turn made the game fun. Many successful game developers do this, especially in prototyping and pre-production, and it has become some kind of definitive way to create a game.

I personally think iteration like this is a very powerful method to use in developing a game, but I also see a pitfall that developers who use it may be tripped into: A game development may have a good iteration process but the game development as a whole does not move forward, it’s like a hamster wheel where the hamster feels like it is making a serious effort by running as fast as it could but in reality it is just running in place.

There have been numerous cases where developers are falling to this pitfall. You may have heard of some game that were in development hell that lasted for years or even more than a decade, they tried to be very creative and more original than their competitors, they iteratively added and removed features along the way to enhance their game, and they even made major changes to the game engine that they were using to fulfill their creative needs. But let’s think about it, all of these creative processes that they did are similar in some ways to what other successful game developers usually do, so why were they failed while others succeeded? From the many game development articles and stories I have heard or read and also from my own experience in some of the games that I have made (or abandoned) I came to a conclusion that there are two major causes for their failure, the first one is that those who were failed do not know themselves well enough (they unaware of their game development capabilities, the resources they have, the engine they use, the scope of the game they are trying to create, etc) and the second one is that they don’t have a clear and realistic goal in mind while doing their game development iterations, they charge blindly into iterating features as fast as they could without any kind of long term planning at all.

In an ideal world where there are no time constraint, no budget limitation and no technical hurdles we may freely be as creative as we want in developing the kind of game that we like, we can indefinitely iterate our game features and be as original as possible. But the reality is, we will always have constraints: we have technological limitation, we have budget limitation, we have knowledge and skills limitation, we have time limitation and so on and so forth.

Let’s say that you, as a programmer, say that given enough time you could implement a particular unique feature of your game while you yourself lacks the knowledge in how to actually implement it, you put it in your backlog or even commit to the team to finish it at a certain date, and that commitment made others in your team starts to create assets or code in the assumption that the particular feature will be in the game, weeks passes by, you have read lots of research papers and you have implemented many different things to no avail, you are running in place in each iteration to implement that feature, all the assets that the others have created with the assumption that the feature will work are discarded, weeks or even months of work abandoned and the project stuck in its place, it doesn’t move forward even with the seemingly diligent efforts that the team have made.

The other case is if you are a game producer and has this brilliant idea that no one has ever done before, let’s say that the idea is to create a full world simulation where there are dozens of different plants and animals and that there are a real world ecosystem in place that governs them, and you want each of the animal has their own personality and distinct behavior, and that each of them are visually appealing using the latest and greatest graphic technology, they must have realistic physically based rendering and of course a hair physics simulation to enhance the immersion. You, who knows nothing about the existing technology other than seeing nVidia technical demos pushed this ideas forward thinking that it is trivial in terms of biology and mathematics, months passes by and you’re stuck because you found out that rendering hundreds of dynamic objects that each has hair physics and complex AI are just not possible, not to mention the complex ecosystem formula and the massive number of data that are calculated each frame is chugging the performance and consistently crashing the game.

There is a saying that a failure is a necessary step towards success, and I do believe it is true, I believe that each failure is a valuable moment for us to get better in the future. But I think it is unwise for us if we are not trying to reduce the chance of failure when there are so many things at stake especially if it belongs to other people properties whether it is time, money (kickstarter backers for example) or both. If we aware of our own capabilities, if we know what kind of resources we have (resource is very broad in this case, it’s not just money, it includes: development time, the skills of the team, how well the team works, marketing capabilities, etc.) then we will be able to create realistic goals, we will be able to confidently choose to sacrifice gameplay over immersion or visual over gameplay (or vice versa), etc. Having a realistic goals will make our iterations more effective, the team can make commitment that they can actually do, adding or removing features will be more meaningful, the game will have a clear scope and will be less likely to suffer from scope trips.

The conclusion is: Don’t just be creative and fully depending on high speed iteration process to develop a game; You must first need to know yourself and then you will know the kind of game that you can possibly create within the limitation that you have and only after which you can be creative and do the high speed iteration process.

Printing UObject information

Sometimes to implement a feature in our game we need to know how Unreal Engine works internally, there are a lot of ways to do this: finding any information on the web, reading the engine codes, debugging the program at some point, printing things to the log, and many more.

In this blog post I would like to share some codes that can help us in printing information to the log in order to understand how Unreal Engine works. Without further ado, these are the source codes :

http://pastebin.com/YZex4TRD

There are some debugging functions in the source codes, but the most important one is the TraceObject function.

// Flags for TraceObject
#define TOF_OBJECT_DETAILS     0x01
#define TOF_CLASS_DETAILS      0x02
#define TOF_PROPERTY_DETAILS   0x08

#define TOF_ALL_DETAILS            0xff
#define TOF_NONE               0x00
// End of flags for TraceObject

/**
* Print information of an object to the log.
* @note: This function only works in debug builds. (DebugGame or DebugGameEditor), it does nothing in Development or Shipping build.
* @param    Object                  The object whose information will be written to the log.
* @param    Title                   The title that will be added at the beginning of the information.
* @param    PropertyNameToTrace     List of property names to be included in the the information.
* @param    TraceObjectFlags        Bit flags of what details to be added to the information, the default value is to print all details.
*/
GAME_API void TraceObject( const UObject* Object, const FString& Title = TEXT(""), const TArray<FName>& PropertyNamesToTrace = TArray<FName>(), int32 TraceObjectFlags = TOF_ALL_DETAILS  );

This function is also a part of the game module that I am currently working on ( it’s still far from completio n) that you can get at : https://github.com/fathurahman/game-modules

Usage

Using the TraceObject function is very simple, at the very least you just have to specify the Object that you wish to print and a title that will be written at the beginning of the logs. e.g: `TraceObject( MyObject, TEXT(“Just a test”) ).

If you wish to print information about some properties in the object, you can specify the PropertyNamesToTrace parameter. e.g:

TArray&amp;amp;amp;lt;FName&amp;amp;amp;gt; PropertyNames;
PropertyNames.Add( &amp;amp;amp;quot;Foo&amp;amp;amp;quot; );
PropertyNames.Add( &amp;amp;amp;quot;Bar&amp;amp;amp;quot; );
TraceObject( MyObject, TEXT(&amp;amp;amp;quot;Just another test&amp;amp;amp;quot;), PropertyNames );

There are three categories of information that can be printed by TraceObject function: Object details, Object’s class details, and the last one is property details. By default TraceObject will print all of them but you can control what details should be printed to the log by specifying the TraceObjectFlag.

For example if you do not specify the TraceObjectFlags or you’re using TFO_ALL_DETAILS then it will print out a lot of information. e.g:

LogTrace: OnMatchStateSet [GameState_0] : 
LogTrace:   Object URL    : GameState /Game/Maps/UEDPIE_0_Map_Test.Map_Test:PersistentLevel.GameState_0
LogTrace:   Object Flags  : RF_Transactional RF_Transient 
LogTrace:   Class URL      : Class /Script/Engine.GameState
LogTrace:   Class Flags    : CLASS_Native CLASS_NotPlaceable CLASS_RequiredAPI CLASS_TokenStreamAssembled CLASS_HasInstancedReference CLASS_Intrinsic CLASS_Constructed 
LogTrace:   Class Hierarchy: Object-&amp;amp;amp;gt;Actor-&amp;amp;amp;gt;Info-&amp;amp;amp;gt;GameState
LogTrace:   Property : MatchState
LogTrace:     URL    : NameProperty /Script/Engine.GameState:MatchState
LogTrace:     Flags  : CPF_Edit CPF_BlueprintVisible CPF_BlueprintReadOnly CPF_Net CPF_ZeroConstructor CPF_DisableEditOnTemplate CPF_EditConst CPF_IsPlainOldData CPF_RepNotify CPF_NoDestructor CPF_Protected CPF_HasGetValueTypeHash CPF_NativeAccessSpecifierProtected 
LogTrace:     Value  : EnteringMap
LogTrace:   Property : PreviousMatchState
LogTrace:     URL    : NameProperty /Script/Engine.GameState:PreviousMatchState
LogTrace:     Flags  : CPF_Edit CPF_BlueprintVisible CPF_BlueprintReadOnly CPF_ZeroConstructor CPF_DisableEditOnTemplate CPF_EditConst CPF_IsPlainOldData CPF_NoDestructor CPF_Protected CPF_HasGetValueTypeHash CPF_NativeAccessSpecifierProtected 
LogTrace:     Value  : EnteringMap

But if you specify TFO_PROPERTY_DETAILS | TFO_OBJECT_DETAILS then the class information will not be printed:

LogTrace: OnMatchStateSet [GameState_0] : 
LogTrace:   Object URL    : GameState /Game/Maps/UEDPIE_0_Map_Test.Map_Test:PersistentLevel.GameState_0
LogTrace:   Object Flags  : RF_Transactional RF_Transient 
LogTrace:   Property : MatchState
LogTrace:     URL    : NameProperty /Script/Engine.GameState:MatchState
LogTrace:     Flags  : CPF_Edit CPF_BlueprintVisible CPF_BlueprintReadOnly CPF_Net CPF_ZeroConstructor CPF_DisableEditOnTemplate CPF_EditConst CPF_IsPlainOldData CPF_RepNotify CPF_NoDestructor CPF_Protected CPF_HasGetValueTypeHash CPF_NativeAccessSpecifierProtected 
LogTrace:     Value  : EnteringMap
LogTrace:   Property : PreviousMatchState
LogTrace:     URL    : NameProperty /Script/Engine.GameState:PreviousMatchState
LogTrace:     Flags  : CPF_Edit CPF_BlueprintVisible CPF_BlueprintReadOnly CPF_ZeroConstructor CPF_DisableEditOnTemplate CPF_EditConst CPF_IsPlainOldData CPF_NoDestructor CPF_Protected CPF_HasGetValueTypeHash CPF_NativeAccessSpecifierProtected 
LogTrace:     Value  : EnteringMap

Example Use Case

I have used this function frequently to study how Unreal Engine works, and I must say that it is one of the most useful method for me to learn Unreal Engine.

One of the things that I have done with this function was when I needed to know what objects are instantiated from a certain actor class that I have made, I call the TraceObject function in the class Constructor, PostInitProperties, PostLoad, PostEditImport, Serialize and OnConstruction, I created a blueprint using this class as its parent and spawn the blueprint actor into the editor world and save the map, from the log I learned a lot of useful things, I learned about the existence of a skeleton object inside a blueprint, I learned how Unreal Engine copies the class default object to instanced object, I learned the process of duplicate an actor in the editor, and many more, all just by reading the log while sipping a cup of hot coffee.

One other useful thing that you have probably known is that the log can be quite cluttered with many different things, especially in debug build, thus having a tool to filter the logs will be really useful, I personally use the many different text processing tools provided by Bash (grep, sed, sort, unique, etc.); You can also turn off some log categories that you don’t really care about, but it’s a lot of work and you will most likely missed out some important information by turning off those logs.

Hopefully the function that I have shared in this blog post will be useful for you as it has been for me.

Flexible Data with UStruct

In game prototyping or pre-production we usually don’t know what kind of data we are going to use, these data will probably change in each iteration as we are trying to figure out the mechanics of our game, and as our code base get larger these changes will be more and more expensive to make and harder to manage. What I am going to show you in the article is an easy and effective way to manage this kind of problem in Unreal Engine 4.

Case Study

For the purpose of explaining the method, I am going to use a simple problem as case study, let’s say that we are making an RPG game in Unreal Engine 4 using C++ and in this game we have combat stats that looks something like this:

  • Health
  • Mana
  • Attack
  • Defense

We decided that the final combat stats of a character is calculated using this formula:

CombatStats = CombatStatsBase + CombatStatsModifier

The CombatStatsModifier is the sum of all CombatStats from the many elements that the character has such as from equipments, from status effects, from abilities, etc. Each component may need some common Arithmetic operations such as addition, multiplication, substraction, etc for generating its CombatStats. For example, the Health of a specific armor is 0.2 times the CombatStatBase of its user.

We have also decided to have an in-game UI that we can toggle at runtime to show the values of each member in CombatStats.

Let’s say that at any point in the development we may expand or change the CombatStats, maybe to something like this:

  • Health
  • Stamina
  • Mana
  • Attack
  • Defense
  • Intelligence
  • Hit
  • Dodge
  • MovementSpeed
  • AttackSpeed

Now from the case study above, we can extract these requirements:

  • CombatStats member variables may change in the future.
  • The final number of members in CombatStats may be more than 10.
  • Two CombatStats can be multiplied, divided, added, or substracted.
  • Since there will be multiplication and division with a fraction (e.g armor adds 20% health), the member should be a floating point number instead of an integer.
  • The user interface should show each of the member’s name, base value, and modifier value.

You must have encounter similar thing in your own game development process especially if you are using pre-production step or using some kind of agile game development practice that embraces changes in order to make a fun game.

Data Structure

First of all, we need to create the data structure for combat stats:

USTRUCT(BlueprintType, meta=(HiddenByDefault))
struct FCombatStats
{
    GENERATED_USTRUCT_BODY()

    UPROPERTY(EditAnywhere, BlueprintReadWrite, Category="CombatStats")
    float Health;

    UPROPERTY(EditAnywhere, BlueprintReadWrite, Category="CombatStats")
    float Mana;

    UPROPERTY(EditAnywhere, BlueprintReadWrite, Category="CombatStats")
    float Attack;

    UPROPERTY(EditAnywhere, BlueprintReadWrite, Category="CombatStats")
    float Defense;

    // Arithmetic operators
    FCombatStats operator*(const FCombatStats& Other) const;
    FCombatStats operator/(const FCombatStats& Other) const;
    FCombatStats operator+(const FCombatStats& Other) const;
    FCombatStats operator-(const FCombatStats& Other) const;
    // End of Arithmetic operators
};

Now lets look at the unreal struct metadata, we specified BlueprintType because we want this struct to be exposed to blueprint for obvious reasons that I do not need to explain, and the second one is HiddenByDefault which means that we told unreal to not show the pin when we break or make the structure in blueprint, the reason is because we will have more than 10 members, exposing all of them will be quite messy and we’re not going to need all of them anyway in most of our blueprint graphs.

Arithmetic Operator

In the struct declaration, we declared several Arithmetical operators, this is one of them:

FCombatStats FCombatStats:operator*(const FCombatStats& Other) const
{
    const float * const SelfPtr = reinterpret_cast<const float * const>( this );
    const float * const OtherPtr = reinterpret_cast<const float * const>( &Other );

    FCombatStats Result;
    float* ResultPtr = reinterpret_cast<float*>( &Result );
    int32 ElementNum = sizeof(FCombatStats) / sizeof(float);
    for (int32 i = 0; i < ElementNum; i++)
    {
        ResultPtr[i] = SelfPtr[i] * OtherPtr[i];
    }

    return Result;  
}

This operator is flexible and does not need to be changed if we modify or extend the members of FCombatStats. We can also say that the operator is independent or decoupled from the data. Other operators in this struct are similar to this one.

Blueprint Function Library

The operators the we have made are for C++, they are not accessible from Blueprint, to do that we need to make a Blueprint function library, it is quite simple and looks something like this:

UCLASS()
class UCombatStatsStatics : public UBlueprintFunctionLibrary
{
    GENERATED_BODY()
public:

    UFUNCTION(BlueprintPure, Category="CombatStats", meta=(DisplayName="CombatStats * CombatStats", CompactNodeTitle="*", Keywords="* multiply", CommutativeAssociativeBinaryOperator = "True"))
    static FCombatStats Multiply_CombatStatsCombatStats( FCombatStats A, FCombatStats B ) { return A * B; }

    UFUNCTION(BlueprintPure, Category="CombatStats", meta=(DisplayName="CombatStats / CombatStats", CompactNodeTitle="*", Keywords="/ divide"))
    static FCombatStats Divide_CombatStatsCombatStats( FCombatStats A, FCombatStats B ) { return A / B; }

    UFUNCTION(BlueprintPure, Category="CombatStats", meta=(DisplayName="CombatStats + CombatStats", CompactNodeTitle="+", Keywords="+ add plus", CommutativeAssociativeBinaryOperator = "True"))
    static FCombatStats Add_CombatStatsCombatStats( FCombatStats A, FCombatStats B ) { return A + B; }

    UFUNCTION(BlueprintPure, Category="CombatStats", meta=(DisplayName="CombatStats - CombatStats", CompactNodeTitle="-", Keywords="- substract minus"))
    static FCombatStats Substract_CombatStatsCombatStats( FCombatStats A, FCombatStats B ) { return A - B; }

};

The functions have many meta data and almost all of their purpose are to make the blueprint graph much cleaner, and the other important purpose is to make them usable in one of the best feature in Blueprint, the Add Math Expression node that basically enables Blueprint user to type mathematical expression instead of creating dozens of haywire nodes that are hard to read and manage.

Since these functions are basically calling the C++ operators, they are automatically become as flexible as the operators.

User Interface

The last one is the User Interface, we are using UMG (Unreal Motion Graphics) and we make a widget, WB_CombatStatWidget, that displays a single member of FCombatStats and then we make another widget, WB_CombatStatsPanel, that creates as many WB_CombatStatWidget as the number of members in FCombatStats and arrange them in a vertical box.

I am not going to go further into UMG as it is not within the scope of this article, but I am going to show you one of the most important function in the c++ parent class of WB_CombatStatsPanel. But before that let’s have a look at what we are trying to display in WB_CombatStatWidget, it is something like this:

[NameText] : [BaseValueText] ( +/- ModifierValueText )

The ModifierValueText is optional, the text may not visible if the modifier value is 0 and it is also colored differently when it has negative value (red) as opposed to positive value (green). This is a common representation of a character stat in most RPG or Strategy games such as Diablo, Torchlight or Dota 2; The data for WB_CombatStatWidget is:

USTRUCT(BlueprintType)
struct FCombatStatWidgetData
{
    GENERATED_USTRUCT_BODY()

    UPROPERTY(BlueprintReadWrite, Category="UI")
    FText NameText;

    UPROPERTY(BlueprintReadWrite, Category="UI")
    FText BaseValueText;

    UPROPERTY(BlueprintReadWrite, Category="UI")
    FSlateVisibility ModifierValueTextVisibility;

    UPROPERTY(BlueprintReadWrite, Category="UI")
    FLinearColor ModifierValueTextColor;

    UPROPERTY(BlueprintReadWrite, Category="UI")
    FText ModifierValueText;
};

Now, this data will be fed to each WB_CombatStatWidget created by WB_CombatStatsPanel, and WB_CombatStatsPanel get these data from this function below:

void UCombatStatsPanel::GetCombatStatWidgetDataList( const FCombatStats& BaseStats, const FCombatStats& ModifierStats, TArray<FCombatStatWidgetData>& OutDataList ) const
{
    UScriptStruct* CombatStatsStruct = FindObject<UScriptStruct>( nullptr, TEXT("/Script/MyProject.CombatStats") ); 

    OutDataList.Empty();

    for ( TFieldIterator<UFloatProperty> It(CombatStatsStruct); It; ++It )
    {
        UFloatProperty* Prop = *It;
        float BaseStat = Prop->GetFloatingPointPropertyValue( (void const *)(&BaseStats) );
        float ModifierStat = Prop->GetFloatingPointPropertyValue( (void const *)(&ModifierStats) );

        FCombatStatWidgetData Data;
#if WITH_EDITOR
        Data.NameText = Prop->GetDisplayNameText();
#else
        // TODO: create a lookup for member name or resources, but for now just use the name of the property
        Data.NameText = FText::FromString( Prop->GetName() );
#endif
        Data.BaseValueText = FText::AsNumber( BaseStat );
        if ( ModifierStat == 0 )
        {
            Data.ModifierValueTextVisibility = ESlateVisibility::Hidden;
        }
        else
        {
            Data.ModifierVisibility = ESlateVisibility::Visible;

            if ( ModifierStat > 0 )
            {
                Data.ModifierValueTextColor = FColor::Green;
                Data.ModifierValueText = FText::FromString( FString::Printf( TEXT("+ %.0f"), ModifierStat ) );
            }
            else
            {
                Data.ModifierValueTextColor = FColor::Red;
                Data.ModifierValueText = FText::FromString( FString::Printf( TEXT("- %.0f"), FMath::Abs(ModifierStat) ) );
            }
        }

        OutDataList.Add( Data );
    }
}

As you can see in the code, we are not doing brute force by writing it like this:

// Health
Data.NameText = LOCTEXT("Health", "Health");
Data.BaseValueText = FText::AsNumber( BaseStats.Health );
Data.ModifierValueText = FText::AsNumber( FMath::Abs(ModifierValue.Health) );

...

// Defense
Data.NameText = LOCTEXT("Defense", "Defense");
Data.BaseValueText = FText::AsNumber( BaseStats.Defense );
Data.ModifierValueText = FText::AsNumber( FMath::Abs(ModifierValue.Defense) );

That would not be flexible and very tightly coupled to the data declaration, what we have written are codes that are using the Unreal Engine reflection system, we iterate each of the float properties in that struct and populate the widget data from each of them, this is flexible and we do not need to change it if we modify the FCombatStats as long as it conforms to the rule of having all of the members to be a float point type.

Conclusion

By using this method we can easily modify the FCombatStats as much as we want without needing to rewrite the Arithmetic operators, UI codes, and many other codes that uses FCombatStats.

I have used this method in my project, it works well in both the editor and shipped game, it has significantly increased the speed of the development iterations, and I can focus on more important stuff of actually making the game fun.

One thing what I am worried about is the reinterpret casts in the Arithmetic operators, but if Unreal Engine has managed the endianness of the underlying platform (and I believe it has) then it wouldn’t be a problem, and as far as I know the only platforms that uses big-endian are IBM servers, which I don’t think has a large market share for games, they are.. well.. servers, that are meant to run non-game applications. But if you want to be on the safe side, you can use similar techniques as the UI codes which is iterating the script struct properties.

Typing Speed Improvement Tips

I had always been a below average typist compared to other programmers that I know, my typing speed was around 65 WPM (Words Per Minute) and I felt that I could not get any better because of my physique, my height is 164 cm and my fingers are rather short, this fact alone made me lose confidence and felt that I can not get any better no matter how hard I try.

One day, I came across a youtube video that shows a typing competition, the contestants was typing at speed around 150 or more, I wondered how nice it would be if I could type that fast, it would significantly increase my productivity as a programmer. So I test myself again hoping that somehow my typing speed has been improved, but alas, it was not, it was still the same, around 65.

I did not remember why but on that day I wanted to be faster at typing, maybe because my position as lead programmer (albeit just an acting one) made me write reports and e-mails alot and felt that I had less time coding, so I want to remove the jinx that I had in my mind and said to myself that maybe if I learn the correct way I will actually get better.

So I browse the internet for typing guides and best practices, they were mostly teaching the same thing such as the proper way of sitting,  placing fingers at home row, striking the key swiftly, etc. I followed these guides and you know what? my typing speed actually got worse! it dropped to below 60 and at some point I got as low as 49, but I kept on going believing that it will gradually improve.

It takes more than a month for my typing speed to get back to normal at 65, after that I reduced the typing exercise so that I can focus on working on the job that had been a bit behind because of my decreased productivity, but I did not lose hope and still believing in myself that I could be more that what I currently was.

After some months, I began to see improvement in my typing speed, I was averaging at 75, and some months later, I was thrilled that I achieved something that I never thought I could, I was averaging at 80 and sometimes got above 100.

Currently, I am still practicing a couple of minutes a day and kinda find my own style of typing by breaking some of the standard rules, one of them is that I am now also using my right index finger instead of only my left to type the character B, my speed is now averaging around 85 and even though it is not fast at all compared to others but I am pretty happy with it and felt that I can code much faster than I was last year.

If you are like what I had been, believing that you can not get any faster at typing, then please don’t, here are my tips:

  1. Practice doesn’t make perfect, only perfect practice makes perfect, learn the standard way of typing and only then create styles that suits you.
  2. Improve your language, the better you know the language you are typing in, the faster you would be.
  3. Practice everyday even though it’s only for a couple of minutes.
  4. Be patient, fast typing speed can not be achieved in one night, it may takes hours of practice to see any improvement at all.
  5. Be clear on the goal that you want to achieve, and refine it along the way, you may at first create a goal of getting 150 WPM but after a month finds out that it’s very hard to even get to 75, so refine your goal to 80, achieving mini goals creates fulfillment and fills you with motivation to achieve your next goal.

I hope these tips can help you as it has helped me in my never ending quest to increase my productivity.

hundred

Inside of Unreal Engine Blueprint

blueprint

Blueprint is a great new feature in Unreal Engine 4, it is a visual scripting that enables everybody including non-programmers to easily creates and tweak Gameplay elements in the game, the tools to make and edit them in the editor are very rich and extendable.

As a game programmer, apart from using Blueprint as a mean to prototype a feature, we may want to extend and customize it to meet the requirements of the game we are working on, extending the blueprint comes in many different flavors, adding a custom blueprint elements in C++ is very easy, we only need to create various C++ functions and properties that are accessible from Blueprint, but sometimes it is not quite enough for us, sometimes we need to create a custom nodes that our game designer can easily use, create an automated process related to blueprint such as collecting blueprint classes, create a utility to convert our custom game actors or data into Blueprints, and many more, this is especially true if you are a tool programmer and trying to optimize the pipeline of your game.

To do an advanced customization of Blueprint, we need to know what is a Blueprint, what is really happening inside of it, what are the data, how does it generates its output, etc. This article is an overview of the answers to all of these questions. It is a part of my study that I want to share with you, in the hope that we can utilize Unreal Engine 4 to its full potentials in order to make a better game with it and especially to increase our productivity by making convenient and optimized tools that are related to Blueprint as part of our game production pipeline.

I will refer to this advance type of Blueprint customization simply as Blueprint customization. This article assume that you have already known Blueprint from end user perspective and also a bit of knowledge in CoreUObject, AssetRegistry, and UnrealEd modules.

What is a Blueprint?

In the simplest sense, Blueprint is just a black box that uses ParentClass as input and produces BlueprintGeneratedClass as output;  A very simple definition of Class would be a collection of information about properties and functions of an Object, and an Object itself is just a series of bytes, thus, a Class is some kind of map for us to know what a certain Object really is.

blueprint-blackbox

Blueprint itself is an asset, it is not a Class, this asset will not be cooked in the final package of our game, which means, we should never reference a Blueprint asset at run-time.

Blueprint is meant to be used in the editor, and making a Blueprint customization should only be done within the context of the editor, either by wrapping our customization codes in WITH_EDITOR or WITH_EDITORONLY_DATA or by creating an editor only module.

An example of blueprint customization is UWidgetBlueprint of UMG (Unreal Motion Graphics), it is derived from UBlueprint and has its own custom editor that is extended from the common blueprint editor, this custom editor has a designer panel that allows us to design the layout of the widget, it is very convenient compared to creating UI by code using Slate, especially for non programmers, it speeds up the UI development process significantly.

widget-blueprint

UWidgetBlueprint, no matter how different it is from ActorBlueprint or AnimationBlueprint, is basically doing the same thing, it creates a Class that extends its ParentClass to produce a new Class. The many extensions that has been done is just to empower UI programmers and designers in creating game user interface, in a sense, customizing a blueprint means we are creating a custom tool for our game production.

What are the Data?

We already know that the input of a Blueprint is a ParentClass, and the output is a BlueprintGeneratedClass. In producing the output, Blueprint processes a lot of Data inside of it, but before we are going inside a Blueprint you will need to redefine the term ‘Blueprint’ itself, from end-user perspective everything in a Blueprint is a Blueprint, the most common misconception is Blueprint Graph, most developers I know will say that a Blueprint Graph is a Blueprint, e.g: “Hey that’s a cool Blueprint, it looks so tidy, the lines are perfectly aligned and the comments are very descriptive, I like it.”, using the word Blueprint for Blueprint Graph will hinder your understanding of Blueprint. Blueprint is an Object that contains many data, including various Blueprint Graphs to produce a BlueprintGeneratedClass, that’s it!

So, What are the data? here they are:

Skeleton Object and Class Default Object

cdo

First of all Blueprint will generate a BlueprintGeneratedClass that is derived from the ParentClass, and then it creates two default objects for this generated class, one of them is a skeleton object (note: it has nothing to do with skeletal mesh), and the other one is the actual default object that will be use as the class default object of the generated class. If you edit an inherited property from the parent class in blueprint editor then you are actually editing the class default object, and if you revert the value that you have edited, then you are reverting it to its skeleton property value.

List of New Properties

vars

The second data in Blueprint is a list of new properties, when you add a new variable in Blueprint it will be added to this list. The mechanism of this property list is actually pretty complex that it needs its own article, so for this article we just assume that there is a property list that records new properties that we create in blueprint.

Simple Construction Script

scs

The third one is a Simple Construction Script (SCS), it is a tree that contains components to be instantiated when an object of this class is created, you can only see the tree when you are creating an actor blueprint, in the editor this is called components tree.

Blueprint Graphs

Graphs

The last one are various Blueprint Graphs, the correct technical term for this is Editor Graph (UEdGraph), there are four categories of Graphs in a common Blueprint: Event Graphs, Function Graphs, Macro Graphs and DelegateSignatureGraph (Event Dispatchers); If you have ever created a blueprint in the editor, then you should already know what they are just by looking at the categories on the left side of the graph editor. We can create more than one event graphs, but in the end they will all be collected into a single Graph that is called an UberGraph (you have probably heard of it when you have error in your blueprint graph). So, what are these graphs? they are basically source codes in the form of a graph that will be compiled into byte codes that can then be fed into UnrealScript virtual machine.

How Does It Generates Its Output?

To generate a BlueprintGeneratedClass, Blueprint needs to be compiled, the compilation process is done by FKismetCompilerContext that is created every time a blueprint is about to be compiled.

Epic has made a good documentation on how this compiler works, you can read it here:

https://docs.unrealengine.com/latest/INT/Engine/Blueprints/TechnicalGuide/Compiler/

Summary

This is the end of this short article about what is inside an Unreal Engine Blueprint.

I hope this article can help you start your own journey in understanding and creating your own blueprint extensions that can help you optimize and speeds up your game production process and creating useful tools for your game development team.

Thanks for reading and please let me know if I have made mistakes in my article.

UObject Constructor, PostInitProperties and PostLoad

Unlike the common c++ constructor, Unreal Engine 4 has a lot of things going on while it creates or loads an object. And in this post I am going to explore the three functions related to object creation: Constructor, PostInitProperties, and PostLoad.

This post is a part of my Unreal Engine study, the goal is not to modify or tweak the engine but to make me better at deciding where I should write a particular object initialization code in the game. I assume you already have at least a bit of understanding and experience in writing Unreal Engine c++ codes and have generally known the unreal engine tool chain (UHT and UBT).

Change of Paradigm

UObject is the base of almost all of Unreal Engine objects, including UProperties, UStruct, UClass, UActor, etc. When writing a c++ class sometime we need to initialize some properties that we have made, for example:

class MyClass
{
	int32 X;
	int32 Y;
public:
	CFoo( int32 InX, int32 InY )
    	: X(InX)
    	, Y(InY)
	{}
};

And then we do the following to create an object of that class:

MyClass A = new MyClass( 10, 10 );

It is pretty standard, and we probably use it all the time in c++ but alas we can not do it like that for UObject class, it is inconvenient at first, especially when you’re used to it before you are using Unreal Engine, but all we need to do is to change our paradigm, Unreal Engine has so many cool features such as object replication, reflection, object garbage collection, etc. You only need to adapt to the special way in which Unreal Engine does its things, the trade off between convenience and benefits are very significant, especially if we broaden our view to the whole game production, it empowers the whole team, not just programmers, we can implement cool game features that are easy to tweak, we can create our own game system based on what Unreal Engine has provided and create a custom editor for it, and many more. If you do not change your paradigm and insist to use the way you are convenient with before you use Unreal Engine then you will have a hard time in your game development.

One of my friend insisted that he wanted to use a full non-unreal engine c++ to create item and inventory system for his game just because he had done something similar in his previous game and he did not want to change his way of doing things, what happened next was he spent weeks implementing it, I admit it was a solid system from native c++ perspective but it was so hard to integrate it to Unreal Editor, he needed to make his own serialization code, he needed to make his own item editor from scratch, he needed to expose his non-unreal objects to actors in the world, it was just too hard to do and he gave up midway, he missed the point of using Unreal Engine to help us game programmers to implements our features easily.

All we need to do is to accept it as it is and just climb the steep learning curve of Unreal Engine c++ programming and we will reap the great benefit of increased productivity and efficiency later.

Methodology

Now back to the topic, this particular blog post is my attempt to understand what UObject Constructor, PostInitProperties, and PostLoad are. The method I am using is to write object information logs whenever these functions are called by Unreal Engine. The information are: Object Path, Object Flags, Class Flags and the value of a custom integer property: Foo.

All Unreal object has a unique path in the form of a string, for example:

/Game/MyGame/MyAsset.MyAsset.ASubObjectOfMyAsset.AnotherObject

If you split the path using dot as delimiter you will get:

1. /Game/MyGame/MyAsset
2. MyAsset
3. ASubObjectOfMyAsset
4. AnotherObject

Each of them represents different objects where the later object is contained within the previous object, in Unreal Engine term: the later object has the previous object as its outer. The outer-most object is always a special object called Package, in this case it is /Game/MyGame/MyAsset, and all Unreal Engine object except for Package always directly or indirectly contained within a Package.

Object flags is a bit flags that tells us the state of the object, for example if it has RF_Public then this object is visible outside of its package.

Class flags is a bit flags of the object’s class, for example, if it has CLASS_Abstract then the class can not be instantiated. Class itself is a UObject that has UStruct as its parent, but I am not going to delve into it this time as it deserves its own study.

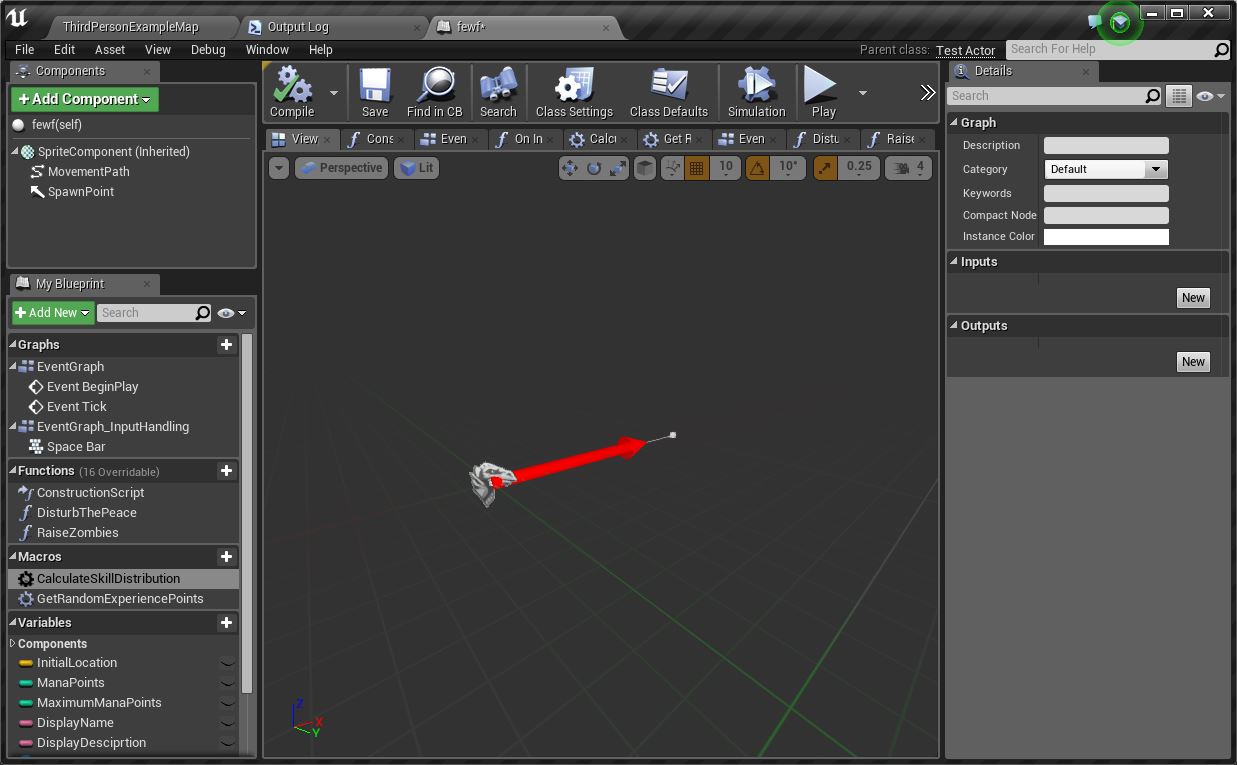
For the purpose of the test I created an object class, UTestObject :

UCLASS(Blueprintable)
class PACZ_API UTestObject : public UDataAsset
{
    GENERATED_BODY()
public:

	/** Custom Property, Foo. */
	UPROPERTY( EditAnywhere, BlueprintReadWrite, Category = "Test" )
	int32 Foo = 100;

public:

	/** Constructor. */
	UTestObject(const FObjectInitializer& ObjectInitializer);

	/** PostInitProperties override. */
	virtual void PostInitProperties() override;

	/** PostLoad override. */
	virtual void PostLoad() override;
};

I put my logging codes in all of the three functions: UTestObject (the constructor), PostInitProperties and PostLoad; I will then examine the logs that are written whenever these functions are called.

Pacz is the primary game module that I use to do the test, thus PACZ_API is the API keyword for this module, unless you are certain that you want to keep this class private within its own module then it is a good practice to add the API keyword (or MinimalAPI class flag) to your class, because you never know whether you want to expose it later along the development, I will not discuss this any further because module management is a big subject that has already been clearly documented in Unreal Engine learning resources.

ClassDefaultObject

After I have written my UTestObject in c++, I started up the editor, and it triggered the first construction of my test object, the logs are as follows:

[Constructor]
     Object Path  = /Script/Pacz.Default__TestObject
     Object Flags = Public ClassDefaultObject ArchetypeObject
     Class Flags  = Native RequiredAPI Intrinsic Constructed
     Foo          = 100
[PostInitProperties]
     Object Path  = /Script/Pacz.Default__TestObject
     Object Flags = Public ClassDefaultObject ArchetypeObject
     Class Flags  = Native RequiredAPI Intrinsic Constructed
     Foo          = 100

The object constructed by Unreal Engine was the ClassDefaultObject, every class has at least one default object, it is an ArchetypeObject which means that it is an object that can act as a template for another object instantiated from this class.

Now please examine the package of this object, it is in /Script/(ModuleName), in my case it is /Script/Pacz, your native unreal objects (including classes) in a certain module will all be contained in this package, it is populated by Unreal Header Tool (UHT) whenever you compile your c++ code. If you have another game module in your project, for example MyGameEditor, then all native unreal objects in that module will resides in /Script/MyGameEditor. Please note that all c++ codes that are not marked by special UHT macros (e.g: UENUM, UCLASS, UFUNCTION etc) will not be visible to Unreal Engine, it will not even know that these functions, classes, or properties even exist in the first place.

The object flag Public (RF_Public), means that this object is visible outside of its package, an example of non public object is a sub object, you need to actually get the instance of its outer and then access the object. Every object you can see or use in the editor without opening a special editor for a certain object (e.g Blueprint Editor, UMG Editor, etc) is Public.

Now lets see the Class Flags, the class is marked as Native, which means it’s from native c++ code instead of from Blueprint (Blueprint generates non-native object class), it is also marked as RequiredAPI, this is the result of adding PACS_API when I wrote the class in c++, if I was to omit the API keyword then it will not be marked as such.

The last class flag is Constructed, all native c++ object classes will be marked as constructed, only blueprint generated classes have the possibilities of not being marked with this flag when those classes have not been constructed by the blueprint construction system.

The last line in the log shows the value of Foo, the value is 100 because this is what I have specified in c++, we will later drr how it will change when we create an asset of this class.

If you are meticulous enough you should have already noticed that PostLoad was not called in this phase, that’s because native objects does not need to be loaded, or we can say that they have already been loaded when the dynamic library in which they reside is loaded by Module Manager.

UTestObject as Asset

Because UTestObject is derived from UDataAsset, it can be instantiated as an asset in the editor, so I go ahead and make an asset of it and I named it MyTestObject and this is the log:

[Constructor]
     Object Path  = /Game/MyTestObject.MyTestObject
     Object Flags = Public Standalone Transactional
     Class Flags  = Native RequiredAPI TokenStreamAssembled Intrinsic Constructed
     Foo          = 100
[PostInitProperties]
     Object Path  = /Game/MyTestObject.MyTestObject
     Object Flags = Public Standalone Transactional
     Class Flags  = Native RequiredAPI TokenStreamAssembled Intrinsic Constructed
     Foo          = 100

What has happened here was Unreal Engine created a new package, /Game/MyTestObject, and then it created a new object of class UTestObject, and then the class default object was copied to this new object, it is the reason why the value of Foo for this new object is 100.

Let’s look at the object flags, it’s not the same as the flags of class default object, because they are different, this is an asset object, not an archetype object, this is why it does not have both ClassDefaultObject and Archetype flag anymore.

There are two new flags in this object: Standalone and Transactional.

Standalone means that this object will not be discarded even if it is not referenced by another object, you have probably known that Object will be discarded (or garbage collected) by unreal engine if it is not strongly referenced or it is not rooted (rooting an object is not within the scope of this post so I will not discuss it here), and from this test we also know that objects that are flagged as standalone will not be garbage collected, but the caveat here is that they are not discarded as long as the packages they’re in are loaded, if for some reason the packages are unloaded, these objects will be elligible to be garbage collected;

Transactional means that almost all changes to the value of the properties of this object are recorded and can be reverted, which means we can undo or redo the changes in the Editor.

In the log, you can see that the UTestObject class gains a new flag, TokenStreamAssembled, this means that the token stream of this class has been assembled and ready to be used by others (Kismet blueprint nodes, details panel, property widgets, etc), Unreal Engine assembles the token stream before hand because the user needs it to edit the asset. I am not particularly sure about this but I assume this is what had happened based on my limited understanding of Unreal Engine.
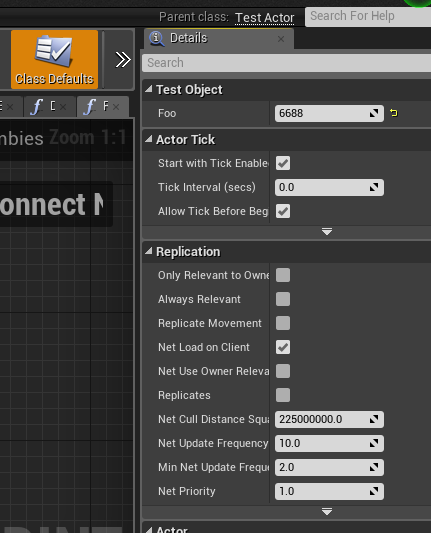
Editing Foo

I opened up the asset by double clicking it, it opened up an object editor, and then I changes the value of Foo to 25 and save the asset.

There is nothing printed in the log, which means none of the three functions are called, but what happened here was I directly edited the property Foo and the package in which the object is contained is marked as dirty (it is displayed as asterisk character at the bottom left of the asset’s thumbnail), and then when I saved it the asset object was serialized to disk and the asterisk character was gone (because it was not dirty anymore).

Post Load

So, when does the PostLoad function gets called by Unreal Engine? for this we need to restart the editor in order to force the asset to be reloaded (there are other ways to do this but this is the simplest one and the test project is small enough that restarting it only takes a few seconds).

After I restarted the editor, there is no PostLoad for the new asset, why? because Unreal Engine should not do that, all assets are in the form of meta data (FDataAsset) when the editor starts, the actual assets are loaded only when they are actually used, let’s imagine a project that has gigabytes of assets, if Unreal were to load them when the editor starts, they will take tremendous amount of time and memory space and I am not sure if the PC we’re using is able to handle such huge amount of data.

To trigger PostLoad, we need to use the asset, so I just opened it in the editor and this is the log:

[Constructor]
     Object Path  = /Game/MyTestObject.MyTestObject
     Object Flags = Public Standalone Transactional NeedLoad NeedPostLoad NeedPostLoadSubObjects WasLoaded
     Class Flags  = Native RequiredAPI TokenStreamAssembled Intrinsic Constructed
     Foo          = 100
[PostInitProperties]
     Object Path  = /Game/MyTestObject.MyTestObject
     Object Flags = Public Standalone Transactional NeedLoad NeedPostLoad NeedPostLoadSubObjects WasLoaded
     Class Flags  = Native RequiredAPI TokenStreamAssembled Intrinsic Constructed
     Foo          = 100
[PostLoad]
     Object Path  = /Game/MyTestObject.MyTestObject
     Object Flags = Public Standalone Transactional WasLoaded LoadCompleted
     Class Flags  = Native RequiredAPI TokenStreamAssembled Intrinsic Constructed
     Foo          = 25

As you can see here, in PostInitProperties, the value of Foo is still the same as the one from ClassDefaultObject, 100, only after the object has been loaded will it change to the value we have previously entered, 25. You have probably known that we can revert the value of a certain properties by clicking the yellow rollback arrow at the end of the property value, reverting a value means that the value is reverted back to the archetype object value.

Conclusion

This is the end of the simple test that I have conducted, there are many interesting things that I have learned during the test but I did not write in this post because I want to keep it short (because it’s just a blog post, not a book).

I also realized that I haven’t explained the difference between Constructor and PostInitProperties, although they looked the same but they are actually two very different things, to put it simply in Constructor the object is still an abstract entity, it can not see the “world” yet, it’s still in incubation, while in PostInitProperties the object has been born, it has gotten out of its womb and ready to go on an adventure. There are a lot of things you can do in the constructor that can not be done in PostInitProperties and vice versa.

I have actually done a lot of other similar test for many kinds of objects, the most interesting one is when I examined an actor blueprint using this method, I learned how both the skeleton object and the generated class default object of the blueprint were constructed and loaded, I also learned the difference between object flags and class flags for different object instances in the blueprint. What happened under the hood when the actor blueprint was spawned into the world really helped me to both understand more about Unreal Engine and helped me implemented a particular feature in the game that i am currently making.

Some of you may think that it is unnecessary to know these kind of things and to just use blueprint for everything, it’s probably true for small game projects or a project that only uses the existing Gameplay classes that Unreal Engine has provided (they are mostly related to multiplayer game using a set of built-in character archetypes) but what if you wanted to make an original gameplay that is different from what has been provided by Unreal Engine? Let’s say you are creating something like Civilization or Skyrim, what will you do then? you will inevitably need to know this stuff, and it’s not an easy thing to learn, at least for me, learning it as early as possible is the best way to do to prepare for the problems we are going to face later in our project (or future projects).

Thank you for reading this post and I will be very happy and grateful if you can spot any errors in my understanding of Unreal Engine and tell me all about it in the comment section or e-mail.

Game Programming Principles

Overview

Prior to writing this blog post, I had a friend of mine asked me what he should learn to increase his skills in using Unreal Engine, so I told him what I know of it in a sequential and progressive learning steps, I also directed him to some good online tutorials and reading materials, after that we talked quite a bit and I soon learned that his long-term goal is to become a AAA game programmer, he did not know what specialization he wanted to pursue in the future but his career goal was clear, he already had a dream of becoming a game programmer in a certain multinational AAA game studio; Since we are talking about the future, we broaden our scope and looked past the limitation of tools such as Unreal Engine, and we came to the very core of being a game programmer, the essence of programming a game, the long-lasting knowledge of it, in summary: The Game Programming Principles. And this blog post is basically the result of our discussion.

Principles vs Techniques

Principles are completely different from Techniques. Principles will never change, they are laws, they are commanding and you can not escape from them because they are always there. Techniques, on the other hand, may come and go, they may get iterated, refined, and factored, some techniques can last for a decade or more but it is inevitable that they too will get replaced with a better one.

Knowing the techniques of doing something is important, because without them you will not be able to produce results, in the simplest sense, if you don’t know how to do something you can not do it. Principles, on the other hand, are not practical, you can not act upon them. but they help you to understand a technique or even create a new one.

Let’s say you are now using Unreal Engine and you need to create a path for the AI to follow. So you search through the web and found a tutorial on how to do it by using Spline, the initial 7 steps to create a spline are:

  1. Create an actor blueprint, BP_PawnMovementPath, and edit the blueprint by double clicking it in the content browser.
  2. Add a SplineComponent to the blueprint by clicking the Add Component button on the upper left corner of the blueprint editor.
  3. Rename the SplineComponent to “MovementSpline”.
  4. Drag and drop BP_PawnMovementPath from content browser to the Viewport to spawn it.in the world.
  5. Open the details panel of the actor and select “MovementSpline”, the spline is now ready to be edited.
  6. In the Viewport, hold alt and drag the end point of the spline to extends it.
  7. Repeat 6 and create the path that you need, you can fine tune it by moving the control handlers of each spline points.

Now you know how to create a path that a pawn can follow in Unreal Engine, this is a technique that enables you to produce results, you can make an interesting path, you can also alter the spline points to make the character gradually rotates while following the path, etc.

Is this a worthy knowledge to learn? Yes, definitely! you can now make a game (or a part of it) by using this technique. But, let’s say that you are now moving from Unreal Engine to SnowDrop Engine, does knowing this technique helps you when you are faced with the same path following problem? I would say no, the technique can only be used in Unreal Engine. Some of you may say otherwise, because you think it’s kind of similar, there’s also a Spline in SnowDrop and that we can use it to move a scene graph entity, if you have this kind of thinking then you have not differentiate between techniques and principles.

The principle behind this technique is a Spline, it is a polynomial function that produces a smooth curve at the place where the polynomial pieces connects, this function takes a real number as parameter, and the output is also a real number that lies on the curve; The parameter usually limited in a certain span and it is usually referred to as time, especially when the spline is used for kinetics (movement) purposes. There are many kind of splines:  quadratic spline (spline that has 1 control point), cubic spline (has 2 control points), Bezier spline ( a series of curve components that has p-degree), Nurbs ( a mesh of splines ), etc.

The similarity that you noticed after moving from Unreal Engine to Snow Drop, is actually the principle, the spline! If you know the principle, moving from one engine to another will not be daunting, because you already know the principles, you already know the underlying law behind the techniques, you can focus on learning the techniques itself and you will be able learn it much much faster. And what if you are moving to an engine or game framework/library that has no spline implementation? You create one!

Those that has a deep understanding of the principles will be flexible to changes, they are very quick to adapt to new changes (and I can assure you that game programming changes a lot in a matter of months or even weeks), they will not be dependent on the tools they are given, they can create tools to solve a problem, they can create a solution instead of searching for tutorials that may not even exist for the problem they currently face.

Those that are relying only on techniques will be productive for a certain time, at least until the tools they are using becomes obsolete. You may know or hear about someone whose skills becomes obsolete because they are too dependent on the tools, some of them just can not move on, they are still using Macromedia Director or even 8086 Assembly embedded in Pascal code that can only be compiled in Turbo Pascal to make games, they can make them amazingly fast, they are very productive because they have mastered the techniques, but their games are not marketable, it’s fine if it’s just a hobby, but if you want to make a career in Game programming (or programming in general) then it is the worst move I can think of in this industry.

I hope at this point I’ve made my point clear about the difference between principles and techniques.

The Principles of Game Programming

We know that principles hardly ever change, some may never change at all till the end of time, it’s a law, they are huge and heavy objects that you can not move. So, what are the principles of game programming? I think that you yourself should think about it, think hard to find the root of the techniques you are using and only then you will find the principles.

For me, there is only one game programming principles: Math.

Math is very broad, two game programming specializations may emphasize on two different realm of Math, but they are all math none-the-less. Let’s take, for example, a Gameplay programmer, she needs to create a skill tree for her RPG game, a tree is a graph in mathematics, if she tries to find a solution to her task by thinking in term of graph she will understand the problem better and will surely find a good solution in implementing her skill tree regardless of what engine and what programming language she’s using; Another example is an Engine Programmer, he needs to create a system that manages huge assets in a platform that has a lot of limitations, if on top of knowing the system specification and techniques he also understood statistics, data structure, graph, different kinds of algorithms and other related principles, he will be able to create a solid and efficient asset management system compared to those who don’t know those principles. The last example is a Game Programmer that needs to implement a feature request from an inexperienced game designer, the feature seems easy to implement on the surface but it’s actually very hard or even impossible to solve, if he knows about computer complexity and intractability (NP-completeness) he will take less time in deciding whether a particular problem is unsolvable (NP-complete) and tell the game designer about it as soon as possible so that she can change her design, Game programmer that does not know this principle will spend months to solve this problem and failed (of course it is, because it is an NP-complete problem) during which many expensive assets and features have been created in the assumption that the problem can be solved, it’s waste of time and money and the game will definitely suffer a major step back or even cancelled.

About Design Pattern

Design pattern is, i think, a dividing line between principles and technique, depending on how or where we see it, it can become a non-binding principle or a technique.

Design patterns are the collective wisdom of many game developers, they are things that are extracted from hundreds of hours of hands on experience, failures and research. They are not as commanding as Math, but it would be foolish to ignore the wisdom and try to re-invent the wheel yourself. It’s not that easy to differentiate between design pattern and techniques, to know which is which we need to know the term of Design Pattern itself,  Design Patterns are reusable solutions to commonly recurring problems, it’s like a wisdom a child get from his or her parents about brushing teeth at least twice a day, the child does not yet know about tooth cavity or the intense pain it caused, but their parents have, and it would be foolish for the child to grow up into an adult without doing it and got his or her teeth damaged because of it. The habit of brushing teeth twice a day is a design pattern, the details on how to brush teeth including what kind of toothpaste and toothbrush to use is a technique. An example in game programming would be the common solution to solve path finding, the math behinds it is graph and many algorithm related to it (e.g Djikstra) the design pattern is  A* or navigation mesh, you don’t have to reinvent the wheel by trying to come up with a solution because experts has already spent years inventing them, a basic understanding about the underlying math is all we need to adapt to the many implementations of these design patterns. But if you yourself is trying to come up with your own design pattern that is more efficient than the existing ones then you can not see them as a non-binding principles anymore, a basic understanding of their underlying principles are also not adequate to reach your goal anymore, you need to go deeper and be ready to spent hours, weeks, months or even years developing it.

Pitfall of Principles

I would like to warn you about what I think is the pitfall of Principles. If you only concern yourself with Principles and ignores techniques all together then you are a mathematician, you’re a scientist, you’re a philosopher, you’re anything but a game programmer, because you see, game programmer basically programs a game or at least has his or her goals set to creating a game, it’s the main quest for a game programmer (not a sub quest and definitely not a side quest), he learns algebra with the goal of increasing his productivity and capability in solving problems he will have in programming  a game, with that goal in sight he will ignore the philosophical side of algebra of near infinite-dimension of real space, he will even ignore 5th or more dimension because it has no practical usage in Game programming.

It is very easy to avoid this pitfall, just like I said, you need to have a strong goal in your mind so that you don’t wander around aimlessly in the infinite realm of principles. By having a goal you will most likely find the proper balance between principles and techniques that really suits your needs.

Golden Rush, a game for Global Game Jam 2016

I just had the pleasure of participating in Global Game Jam 2016 at Lyto HQ, Jakarta. It was an event where we made a team of random people that we barely knew and create a game within 48 hours.

It was fun, the constraints made me think differently in term of game production, we do not have time to worry about quality and visual, what we can only do is  creating a Gameplay that are both fun and solid within the limited time.

What we made in GGJ 2016 is a game titled Golden Rush, a third person Platformer game using Unreal Engine 4, we created 21 challenging levels and we were pretty happy with the result, some people tried our game and the response are quite nice, we felt that there are still many things that can be tweaked to make the game a little bit better but alas there are just no time for it in the event, what we really proud of is that the game is a complete game, it has all the core features that we have planned for it and more.

It is my first Game Jam ever since I pursued a career in game development. And in this event I learned that:

  1. Making game with a very limited resources, especially time, needs a careful planning including a deep understanding of the team’s capability and a clear vision of the game that we want to create.
  2. Make priorities! there are so many  things to do but the most important things must take the first priority, they should not be at the mercy of those that have lesser importance. In the case of Golden Rush, implementing game mechanics was our top priority and we nailed it down in the first few hours, but after that there are many distraction such as improving the visual or the UI which I think are not as important as tweaking the gameplay elements for this particular game.
  3. List features first and try to find out as best as we can if they can be implemented or not within the limited resources that we have. Those that can not be implemented should be cut up front rather than being assumed that we will find a solution during the game development process. The clearer the features the better the game will be.
  4. Be smart and creative, limited resource should not hinder creativity, it is a challenge to make a fun to play game in this kind of situation.

I would definitely go to this kind of event again in the future, it was exciting, thrilling, and I was able to meet other game developers in Indonesia.

Please check out the game and see if you can defeat one of our team member’s highest score of 1683!